
Table of contents
- Install Windows preview
- Install WSL 2 preview
- Install Nvidia driver preview and CUDA toolkit
- Run CUDA sample application
- Install Docker and Nvidia container toolkit
- Run CUDA containers
- Troubleshoot
- Run WSL + CUDA + Docker + Jupyter + TensorFlow
- Encoding and decoding video with GPU in WSL?
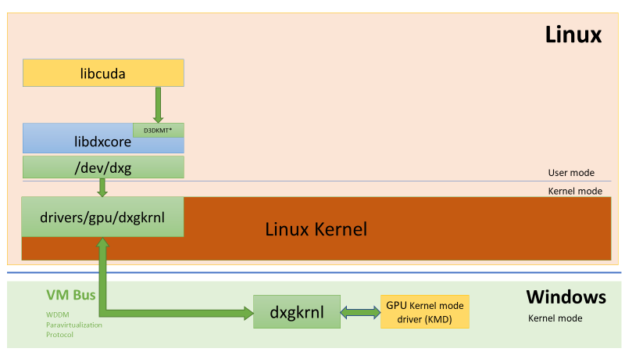
GPU support is the most requested feature in Windows Subsystem for Linux (WSL). It is available in WSL 2.0 through Windows Insiders program. And Nvidia CUDA is supported. The following diagram shows the WDDM model supporting CUDA user mode driver running inside Linux guest:
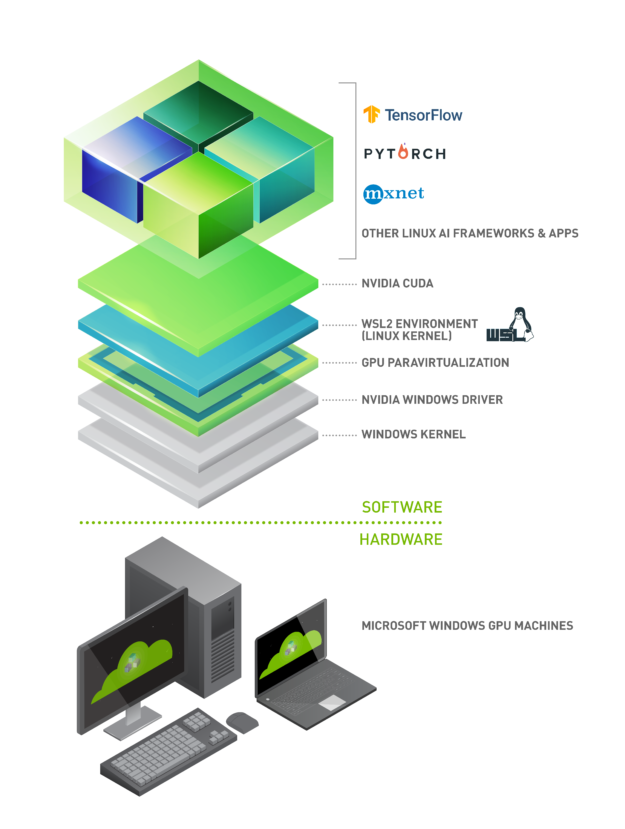
So the popular Linux AI frameworks like TensorFlow, PyTorch, etc. can work with WSL with CUDA acceleration:
This article walks through the installation of Windows, WSL, CUDA in WSL, and Docker in WSL.
Install Windows preview
First, you must enable “Optional diagnostic data”, otherwise Windows cannot join Windows Insiders.

Then, join Windows Insiders program with Microsoft account (an account can be created if you don’t have one: https://insider.windows.com/). The channel must be Dev:

Then run Windows Update. It will download the pre=release installer. Windows will restart and reinstall.
Install WSL 2 preview
In Windows, make sure the following Windows features are enabled:
- WSL:
dism.exe /online /enable-feature /featurename:Microsoft-Windows-Subsystem-Linux /all /norestart - Virtual machine platform:
dism.exe /online /enable-feature /featurename:VirtualMachinePlatform /all /norestart
Now restart Windows, then Windows will have WSL and the wsl command line tool. Run Windows Update again to get the latest WSL 2. When this is done, in the update history, it must show 4.19.121 or later:

Then manually install this patch: https://wslstorestorage.blob.core.windows.net/wslblob/wsl_update_x64.msi. And then run the following command as administrator to update the kernel to the latest version:
C:\WINDOWS\system32>wsl --updateChecking for updates...Downloading updates...Installing updates...This change will take effect on the next full restart of WSL. To force a restart, please run 'wsl --shutdown'. Kernel version: 5.4.72Now go to Microsoft Store, install a Linux distribution. I installed the first one Ubuntu, it is the same as the third item Ubuntu 20.04 LTS

When the installation is done, use the following command to set the default version to 2 and verify:
C:\WINDOWS\system32>wsl --set-default-version 2For information on key differences with WSL 2 please visit https://aka.ms/wsl2The operation completed successfully.
C:\WINDOWS\system32>wsl --list --verbose NAME STATE VERSION* Ubuntu Stopped 2 docker-desktop Stopped 2 docker-desktop-data Stopped 2WSL version can also be set for a specific distribution:
C:\WINDOWS\system32>wsl --set-version ubuntu 2Conversion in progress, this may take a few minutes... For information on key differences with WSL 2 please visit https://aka.ms/wsl2The distribution is already the requested version.Now launch the installed Ubuntu (default) from the Store, or using the command wsl:

For the first time launch, it asks for initializing the user name and password.
Install Nvidia driver preview and CUDA toolkit
In Windows, download the preview driver from Nvidia: https://developer.nvidia.com/cuda/wsl/download and install.
Then launch WSL, install CUDA:
apt-key adv --fetch-keys http://developer.download.nvidia.com/compute/cuda/repos/ubuntu1804/x86_64/7fa2af80.pub sh -c 'echo "deb http://developer.download.nvidia.com/compute/cuda/repos/ubuntu1804/x86_64 /" > /etc/apt/sources.list.d/cuda.list'apt update apt install -y cuda-toolkit-11-1Run CUDA sample application
The CUDA sample source code can be downloaded from GitHub. In WSL, run:
git clone https://github.com/NVIDIA/cuda-samples.gitThen build and run a sample application
cd cuda-samples/Samples/concurrentKernelsmake./concurrentKernelsIf everything is successful, it should find the GPU and show the test output:
[./concurrentKernels] - Starting...GPU Device 0: "Turing" with compute capability 7.5
Detected Compute SM 7.5 hardware with 20 multi-processorsExpected time for serial execution of 8 kernels = 0.080sExpected time for concurrent execution of 8 kernels = 0.010sMeasured time for sample = 0.012sTest passedInstall Docker and Nvidia container toolkit
First, if Docker Desktop is installed in Windows, turn off the WSL integration for WSL in the distro, because It does not work with CUDA in WSL:

Now go to WSL, install Docker from there:
curl https://get.docker.com | shThen install Nvidia container toolkit in WSL:
distribution=$(. /etc/os-release;echo $ID$VERSION_ID)curl -s -L https://nvidia.github.io/nvidia-docker/gpgkey](https://nvidia.github.io/nvidia-docker/gpgkey) | sudo apt-key add -curl -s -L https://nvidia.github.io/nvidia-docker/$distribution/nvidia-docker.list | sudo tee /etc/apt/sources.list.d/nvidia-docker.listcurl -s -L https://nvidia.github.io/libnvidia-container/experimental/$distribution/libnvidia-container-experimental.list | sudo tee /etc/apt/sources.list.d/libnvidia-container-experimental.listsudo apt updatesudo apt install -y nvidia-docker2When it is done, restart docker in WSL:
sudo service docker stopsudo service docker startRun CUDA containers
Now it is ready to run CUDA container:
docker run --gpus all nvcr.io/nvidia/k8s/cuda-sample:nbody nbody -gpu -benchmarkIt should give output like this:
GPU Device 0: "GeForce GTX 1650 SUPER" with compute capability 7.5> Compute 7.5 CUDA device: [GeForce GTX 1650 SUPER] 20480 bodies, total time for 10 iterations: 30.007 ms= 139.776 billion interactions per second= 2795.517 single-precision GFLOP/s at 20 flops per interactionTroubleshoot
Here Windows, WSL 2, Nvidia driver are all in preview. Sometimes when you run container, docker gives error:
docker: Error response from daemon: cgroups: cannot find cgroup mount destination: unknown. ERRO[0000] error waiting for container: context canceledThen WSL has to be restarted. In Windows command prompt:
wsl –shutdown wslIf Docker gives the following error:
Error response from daemon: could not select device driver "" with capabilities: [[gpu]]
Then install nvidia-container-toolkit:
sudo apt install -y nvidia-container-toolkitIf Docker gives error message:
Error response from daemon: cgroups: cannot find cgroup mount destination: unknown.
Then this is the fix:
sudo mkdir /sys/fs/cgroup/systemd sudo mount -t cgroup -o none,name=systemd cgroup /sys/fs/cgroup/systemdRun WSL + CUDA + Docker + Jupyter + TensorFlow
Finally, Jupyter notebook can be used in WSL to run popular AI framework code, like TensorFlow. Nvidia’s official tutorial runs TensorFlow with Jupyter notebook in Docker image tensorflow/tensorflow
docker run -it --gpus all -p 8889:8888 tensorflow/tensorflow:latest-gpu-jupyterHere container’s port 8888 is mapped to WSL’s port 8889, because on Windows I am already running an instance of Jupyter notebook, which already occupies port 8888.
Dock shows the following messages:
________ __________________ __/__________________________________ ____/__ /________ ____ / _ _ \_ __ \_ ___/ __ \_ ___/_ /_ __ /_ __ \_ | /| / /_ / / __/ / / /(__ )/ /_/ / / _ __/ _ / / /_/ /_ |/ |/ //_/ \___//_/ /_//____/ \____//_/ /_/ /_/ \____/____/|__/
WARNING: You are running this container as root, which can cause new files inmounted volumes to be created as the root user on your host machine.
To avoid this, run the container by specifying your user's userid:
$ docker run -u $(id -u):$(id -g) args...
[I 17:15:59.736 NotebookApp] Writing notebook server cookie secret to /root/.local/share/jupyter/runtime/notebook_cookie_secretjupyter_http_over_ws extension initialized. Listening on /http_over_websocket[I 17:15:59.947 NotebookApp] Serving notebooks from local directory: /tf[I 17:15:59.948 NotebookApp] The Jupyter Notebook is running at:[I 17:15:59.948 NotebookApp] http://ccd3c60790ab:8888/?token=8b1969bc9a278498fd5debe119feb6d86130850166425bef[I 17:15:59.948 NotebookApp] or http://127.0.0.1:8888/?token=8b1969bc9a278498fd5debe119feb6d86130850166425bef[I 17:15:59.948 NotebookApp] Use Control-C to stop this server and shut down all kernels (twice to skip confirmation).[C 17:15:59.953 NotebookApp]
To access the notebook, open this file in a browser: file:///root/.local/share/jupyter/runtime/nbserver-1-open.html Or copy and paste one of these URLs: http://ccd3c60790ab:8888/?token=8b1969bc9a278498fd5debe119feb6d86130850166425bef or http://127.0.0.1:8888/?token=8b1969bc9a278498fd5debe119feb6d86130850166425befNow take the last URI, replace “127.0.0.1:8888” with “localhost:8889”, go to Windows and launch browser, paste the URI: http://localhost:8889/?token=8b1969bc9a278498fd5debe119feb6d86130850166425bef, The browser should load the Jupyter notebook with built-in TensorFlow tutorial:

However, running the cells in the notebook, it shows some errors. If it shows an error of git not found (“FileNotFoundError: No such file or directory: ‘git’”), then run these commands in a cell to install git:
!apt update!apt install -y gitIf the python code throws an error “InternalError: Blas GEMM launch failed” or “InternalError: Blas GEMV launch failed”, the fix is to run these code:
import tensorflow as tfphysical_devices = tf.config.list_physical_devices('GPU')tf.config.experimental.set_memory_growth(physical_devices[0], True)The it should work:

Encoding and decoding video with GPU in WSL?
Not supported yet. To test GPU encoding and decoding, the latest version of FFmpeg can be installed:
sudo add-apt-repository ppa:savoury1/graphicssudo add-apt-repository ppa:savoury1/multimediasudo add-apt-repository ppa:savoury1/ffmpeg4sudo apt-get updatesudo apt-get upgrade && sudo apt-get dist-upgradesudo apt-get install ffmpegThen install the Nvidia encoding/decoding libraries:
sudo apt install libnvidia-decode-455sudo apt install libnvidia-encode-455Now try to use FFmpeg to decode a video and encode it with hevc_nvenc:
ffmpeg -hwaccel auto -i input.mkv -map 0:v:0 -map 0:a -map_metadata 0 -loglevel verbose -c:v hevc_nvenc -profile:v main10 -pix_fmt yuv420p10le -preset slow -tune film -b_adapt 2 -b_ref_mode middle -bf 3 -rc vbr_hq -deblock 0:0 -rc-lookahead 25 -rc_lookahead 25 -g 250 -keyint_min 23 -refs 4 -sc_threshold 40 -temporal_aq 1 -spatial_aq 1 -nonref_p 1 -c:a aac -ar 48000 -b:a 256k -ac 6 -b:v 2048k output.nvenc.mp4 –yIt does not work and gives the following error for decoding the input video:
[h264 @ 0x55c4517dd540] decoder->cvdl->cuvidGetDecoderCaps(&caps) failed -> CUDA_ERROR_INVALID_DEVICE: invalid device ordinal [h264 @ 0x55c4517dd540] Failed setup for format cuda: hwaccel initialisation returned error.And it gives the following error for encoding the output video:
[hevc_nvenc @ 0x55c451065b00] OpenEncodeSessionEx failed: unsupported device (2): (no details) [hevc_nvenc @ 0x55c451065b00] Nvenc unloaded Error initializing output stream 0:0 -- Error while opening encoder for output stream #0:0 - maybe incorrect parameters such as bit_rate, rate, width or heightI searched around and found a video of WSLConf’s CUDA session, where Nvidia conforms GPU encoding/decoding is not yet supported in WSL, and will come in the future: